Fiber Optic Light Painting Tutorial by Maria Saggese
If you are not following the Light Painting Photography of Maria Saggese you are missing out on some incredible and inspiring work. One particular style of Light Painting Maria has become know for her beautiful work with Fiber Optics creating images that are instantly recognizable as her own! I asked Maria if she would share some tips about these awesome works of art and she went far beyond that providing us with a full tutorial to share! Read on below for the tutorial and if you find it inspiring as I know you will, please make sure to tag #MariaSaggese when posting any images on social media you create using this technique!
Light Painting Fiber Optic Tutorial by Maria Saggese
In this tutorial I am going to explain how to create beautiful silhouettes with fiber optic using Light Painting Brushes system. I will explain how I set up my camera and I will share my technique to create double silhouettes in the same frame. I will also share how to obtain an overlapping effect and a double exposure "evanescence" effect all during a single long exposure photograph!
Equipment required:
Camera with bulb mode (or Long Exposure)
Tripod Remote or Cable Shutter Release
Light Painting Brushes Fiber Optics + Universal Connector
Torch or Flashlight
RGB Flashlight or LED Flashlight with Colored gels
The tools that I use are the Light Painting Brushes Fiber Optics: There are two versions a Black & White they both attach to just about any flashlight using the Universal Connector.

To change fiber's colors I use a Led Lenser P7QC flashlight with 4 colors or the 10 color "Color Shine RGB Flashlight". You can also customize the color's fiber by placing some colored gels over any torch or flashlight you attach to the fiber optics using the Universal Connector. With the Light Painting Brushes Fibers you can use just about any light attached via the Universal Connector!

Set up
Set up is simple – just the camera on a tripod focused on the area where my model is. To focus I turn on the studio lights, focus on the model with the focal length that I am going to use in my picture then I turn off the studio lights. After focusing with the lights on I switch the camera's focus to manual focus, this will make sure the camera will remain in focus when the lights are off and starting the exposure.
The camera settings that normally I use are:
BULB Mode
F/11-F/13
ISO ranging from 200-400
White Balance: Daylight
RAW format
Technique
After starting the exposure, I go behind the model, I turn on my flashlight moving the tips of fiber with a slight movement to outline the figure as a "cloud" or an aura. Starting from the model's face I slowly outline all parts of the body all the way down to the feet. The most important thing is not to paint with fibers behind the same area several times, otherwise you will not have a defined silhouette.

Settings for this image: 40 Sec Exposure, F/11, ISO 200,Created using the White Fiber Optic.
To get more cloudy or smoky effect I increase the speed of painting with fiber even light painting in front of the model as seen in the image below.

Settings for this image: 50 Sec Exposure, ISO 200, F/10. Created using the White Fiber Optic.
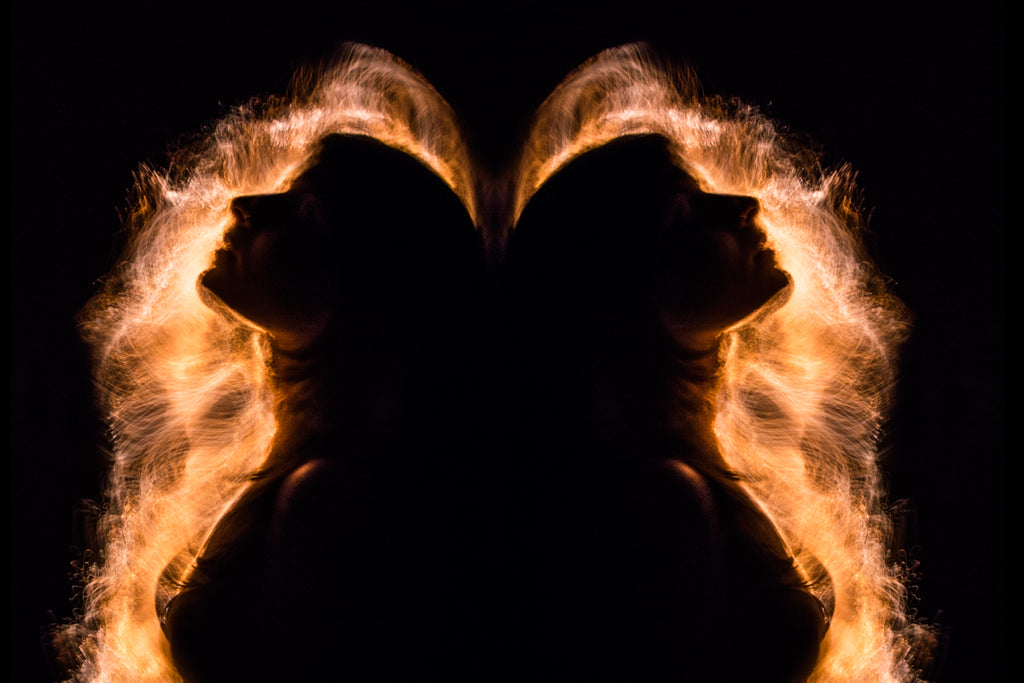
How to create double silhouette
During the same exposure, I first create a silhouette using the techniques described above with one color using the fibers, then I turn off my torch. The model has to move to a new position to reflect on the opposite side. I choose a different color (or the same) to create a second silhouette that will overlap with the first one created.

Settings for this image: 61 Second Exposure, F/11, ISO 200. Created using the White Fiber Optic.

Settings for this image: 140 Second Exposure, F/13, ISO 200. Created using the White Fiber Optic.
Double exposure
To create my double exposure effect I first create my silhouette and then I turn off my torch. Then without a model in the scene I illuminate the background or, in this case, the bed, to obtain an overlapping and "evanescence" effect during the same exposure.

Settings for this image: 54 Second Exposure, F/13, ISO 400. Created using the Black Fiber Optic.

Settings for this image: 60 Second Exposure, F/11, ISO 200. Created using the White Fiber Optic.
White or Black Fiber? Personally I love the white one, because the fiber is completely illuminated and not just the tips, with this I get a more nuanced effect, while the black one has a more contrasted and "Scratched" effect. The result is a little bit different for each tool so you can try both and choose your favorite effect.

Settings for this image: 35 Second Exposure, F/13, ISO 200. Created using the White Fiber Optic.

Settings for this image: 35 Second Exposure, F/13, ISO 200. Created using the Black Fiber Optic.
If you try this technique please share your work on Facebook and Instagram using the hastag #mariasaggese
You can find more of Maria's absolutely beautiful work at the links below:
Facebook
Instagram
Website